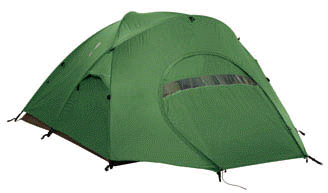
Eureka Assault Outfitter Tent -  4 Man

    Content List

  • 1 Tent Body (marked with color and number)
  • 1 Fly (marked with color and number)
    • Includes 1 piece of webbing that unbuckles from rear door
  • 3 Tent Poles (marked with color)
  • 1 Carry Bag (marked with color and number)
  • 1 Pole Bag (marked with color and number)
  • 1 Stake Bag (marked with color and number)
    • 6 metal stakes
    • 3 yellow plastic stakes
    • 4 rope guy lines

Assembly Instructions

Click here for (printable assembly instructions)

1. Unpack the tent bag and separate the components. Unfold the tent and lay it out with the floor on the ground and with a grommeted web in each corner. Pull the tent into a rough rectangle. Do not stake down the tent just yet; but in windy conditions, stake down one corner that faces into the wind.

2. Assemble the three shockcorded tent poles. Carefully seat each section. Try to keep the poles from snapping together as this can damage the rod ends.

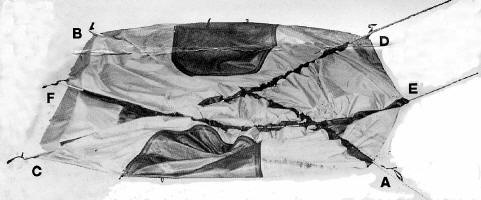
3. At the front of the tent body at A, slide a pole diagonally across the tent, through the sleeves, to the opposite side B. Follow the seam from sleeve to sleeve. Push the pole, don’t pull it. Continue with the second pole through its sleeves from C to D. Finish with the third pole from E to F. See fig.1.


Fig 1

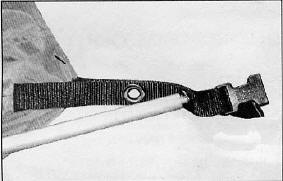
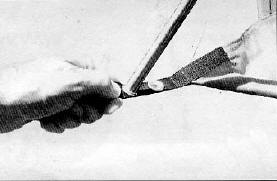
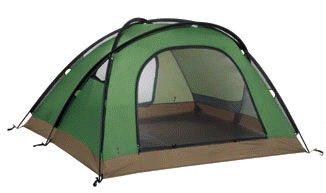
4. Insert the post end of a pole into its grommet on the corner stake-out web. See fig. 2. At the opposite corner, grasp the web and simultaneously push the pole to form an arc. Insert the post into the grommet to maintain tension. See fig. 3.  Repeat with the remaining poles, raising the tent. See fig. 4.


Fig 2


Fig 3


Fig 4

5. Your tent is now free-standing; place it in the desired location and use the metal skewers to stake it down.

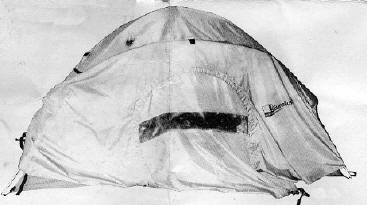
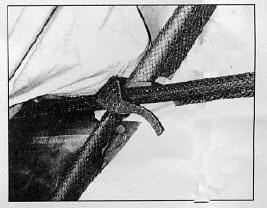
6. With the tent secure, unroll the fly and drape it over the tent. The fly only fits one way. Make sure the vestibule panel window is directly over the front door of the tent. Reach under the fly and connect the Velcro fasteners to the tent pole through the openings in the sleeves. See figs. 5 & 6.


Fig 5


Fig 6

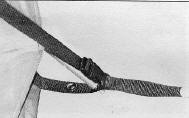
7. Connect the six side-release buckles on the fly to their mates on the tent webs. See fig.7.

8. At the rear of the tent, stake down the pull-out web on the fly.


Fig 7

9. At the front of the tent, pull the vestibule taut and stake it down with the nylon stakes. Make sure that the vestibule is tight across the door flap. With the vestibule staked down and tight, go to the corners I sides of the tent and adjust the web pull-outs to tighten. Then if necessary, adjust the rear vestibule stake out loop. See Fig. 8.

Fig 8

Your tent is now ready for use.

    NOTE:

  • The vestibule door of the fly can be rolled up at the bottom, up to the top or to the side for better ventilation. Attach the toggle to hold in place. To help prevent condensation, keep the doors open.
  • In strong winds, tie extra ropes to the storm loops on the fly and stake down.
  • Take down: Pull up stakes. Release the fly’s Velcro and buckles. Remove fly and open door. Pull posts out of the grommets and push poles out of the sleeves. Collapse the tent poles and stow. Fold the tent onto itself and fold the fly and lay it on tent. Roll up both towards the door and stow.

Back to top

While You’re Camping

STAKING:

All tents need to be staked down to keep them from blowing away.

Securing the tent by placing heavy objects inside is just not adequate.

  • Once the tent body is erected, stake it out before the fly is put on. This enables you to square the tent up to ensure that the fly goes on properly and that the seams align with the frame. Pull the base of the tent taut between each web stake out loop or ring & pin. Make sure that all corners are square. It is important that you don’t stake the tent out too tightly. You will know it’s too tight, if the door zippers can not be easily operated. Drive stakes through the web loops, or with ring & pin, drive the stake just outside the ring so that the “J” hook catches it. Tie a piece of cord or web into a loop through the ring to be used as a large stake loop if needed.
  • With the tent properly staked, drape the fly over the frame, attach its tent connection points and stake down any pull outs.
  • Do not attempt to remove the stakes by pulling on the tent becket loop, as this could cause the fabric to tear. The best way is to pry on the stake itself.

STAKING IN SPECIAL CONDITIONS:

Sand.   Long broad stakes with plenty of surface area are ideal in loose, sandy soil.

Hard, Rocky, or Frozen Soil.   Steel stakes work well in these conditions. Store steel stakes separately. If stored with your tent, the sharp edges can cut the fabric. Steel stakes can also leave rust stains, which might damage your tent.

Snow. Use “dead man” anchors: bury objects (branches, tent bags, or stuff sacks filled with snow) that have a great deal of surface area. Tents can also be tied to snow shoes, skis, or ski poles, which are stuck in the snow.

GUYLINES:

When high winds or a storm are predicted, do not count on staking alone to keep your tent secure. Depending on the model, your tent fly has built-in loops or rings at optimal guyout locations. It’s important to put in the extra time guying out your tent. Correctly done, it can save your tent during exceptional weather.
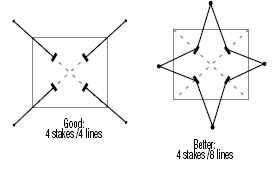
  • Attach parachute cord to the loops/rings and stake them in the ground three or four feet from the edge of the tent. If staked too close to the tent, wind can cause an upward pull that could dislodge the stakes.
  • Make sure that the top fly is securely attached to the framework underneath. Ties, hook and loop closures, or dog-bones and elastic loops are typical fasteners sewn to the underside of the fly for this purpose.
  • It is also a good idea to run two cords at an angle from the side of the guyout. This will prevent all movement, except toward the anchor. The idea is to get the guylines to work together through opposition. See illustrations below:

CONDENSATION & VENTING:

Through perspiration and breathing, an adult gives off about a pint of water overnight. If it cannot escape, the water vapor condenses to liquid. Most often, water found in the tent is a result of this condensation rather than from the tent leaking. Condensation will usually form where the sleeping bag touches the side of the tent, under the sleeping pad, or on coated surfaces such as the door flaps. A tent’s double wall construction allows the vapor to escape through the roof to the outside, keeping the inside of the tent dry.

Leave the windows partially open at night to provide cross ventilation and further reduce condensation. Cross ventilation becomes more important in very humid or extremely cold conditions when the permeable roof is less effective. The features that enhance ventilation are windows, short-sheeted flys (bottom venting), roof vents, and High/Low venting doors. These are specific to each tent model.

It is important to vent the vestibule. Un-vented, it can inhibit airflow into the tent. Eureka! tent vestibules profit from the ability to “short sheet” by means of zippers & toggles and staked vestibule pull outs create a bellowing effect.

Most Eureka! tents are equipped with a patented High/Low venting door. This design allows increased airflow into the tent from the bottom. With backpacking tents, roll the base of the door up and hold it open with the toggle.  Eureka! Performance and 4 Season tents are equipped with 2 High/Low venting doors and high zippered roof vents and allow the best of venting options.

ULTRAVIOLET LIGHT:

Ultraviolet light damage to tent fabric is caused by excessive exposure to sunlight. While our fabrics are UV resistant, any synthetic fabric is susceptible to UV degradation. UV damage will cause nylon and polyester to become brittle and tear easily. We recommend that you use the rain fly even on clear days. It acts as a sunscreen to the tent. A rain fly is both easier and less expensive to replace if damaged. UV damage can be minimized by erecting tents on sites with low exposure to direct sunlight.

GENERAL POLE CARE:

  • Never let tent poles snap together as this can damage the pole end.
  • Do not drop tent or pole bags on their ends and do not bounce a tent bag on its end to get the tent out. These actions may cut the shock cord and damage the pole ends.
  • The aluminum frame may bend slightly and take a “set” through usage; this normally does not affect the performance of the frame.

GENERAL TENT CARE:

  • Sweep the tent floor daily to prevent damage from stones.
  • Try not to wear shoes inside your tent.
  • Use a ground cloth whenever possible.
  • Do not keep food inside a tent. Hungry critters will chew through tent fabric in search of food.

Back to top

When You Get Home

    STORAGE TIPS:

  • Make sure the tent is completely dry, then store loosely rolled, in a dry, cool place. To prevent dust from collecting on the tent, cover it with a cloth. This allows the nylon/polyester fabric to breathe.
  • Ideally, the tent poles should be stored in their fully assembled state. This reduces the tension on the shock cord, prolonging its life.
  • We recommend that the tent bag be used only as a carry sack and not for storage.

    CLEANING:

  • Clean the tent by setting it up and wiping it down with a mild soap (liquid hand soap) and lukewarm water solution. Rinse thoroughly and dry completely. Never use detergent, washing machines or dryers because they can damage the tent’s protective coating and seams. After cleaning, be sure the tent is completely dry, especially the heavier, double-stitched areas such as the seams, before storing or mold and mildew are likely to grow.
  • Clean the tent poles with a cloth and lubricate them with silicone spray. This is especially necessary after oceanside camping trips to remove salt spray so the poles don’t corrode or stay gritty.
  • Clean the zippers with a quick dip in water and then dry them off. This is especially important if you’ve been camping in a location with sand/dirt. If you don’t clean the zippers, the sliders will wear out and eventually the teeth will become inoperable
  • Back to top